Development Guidelines
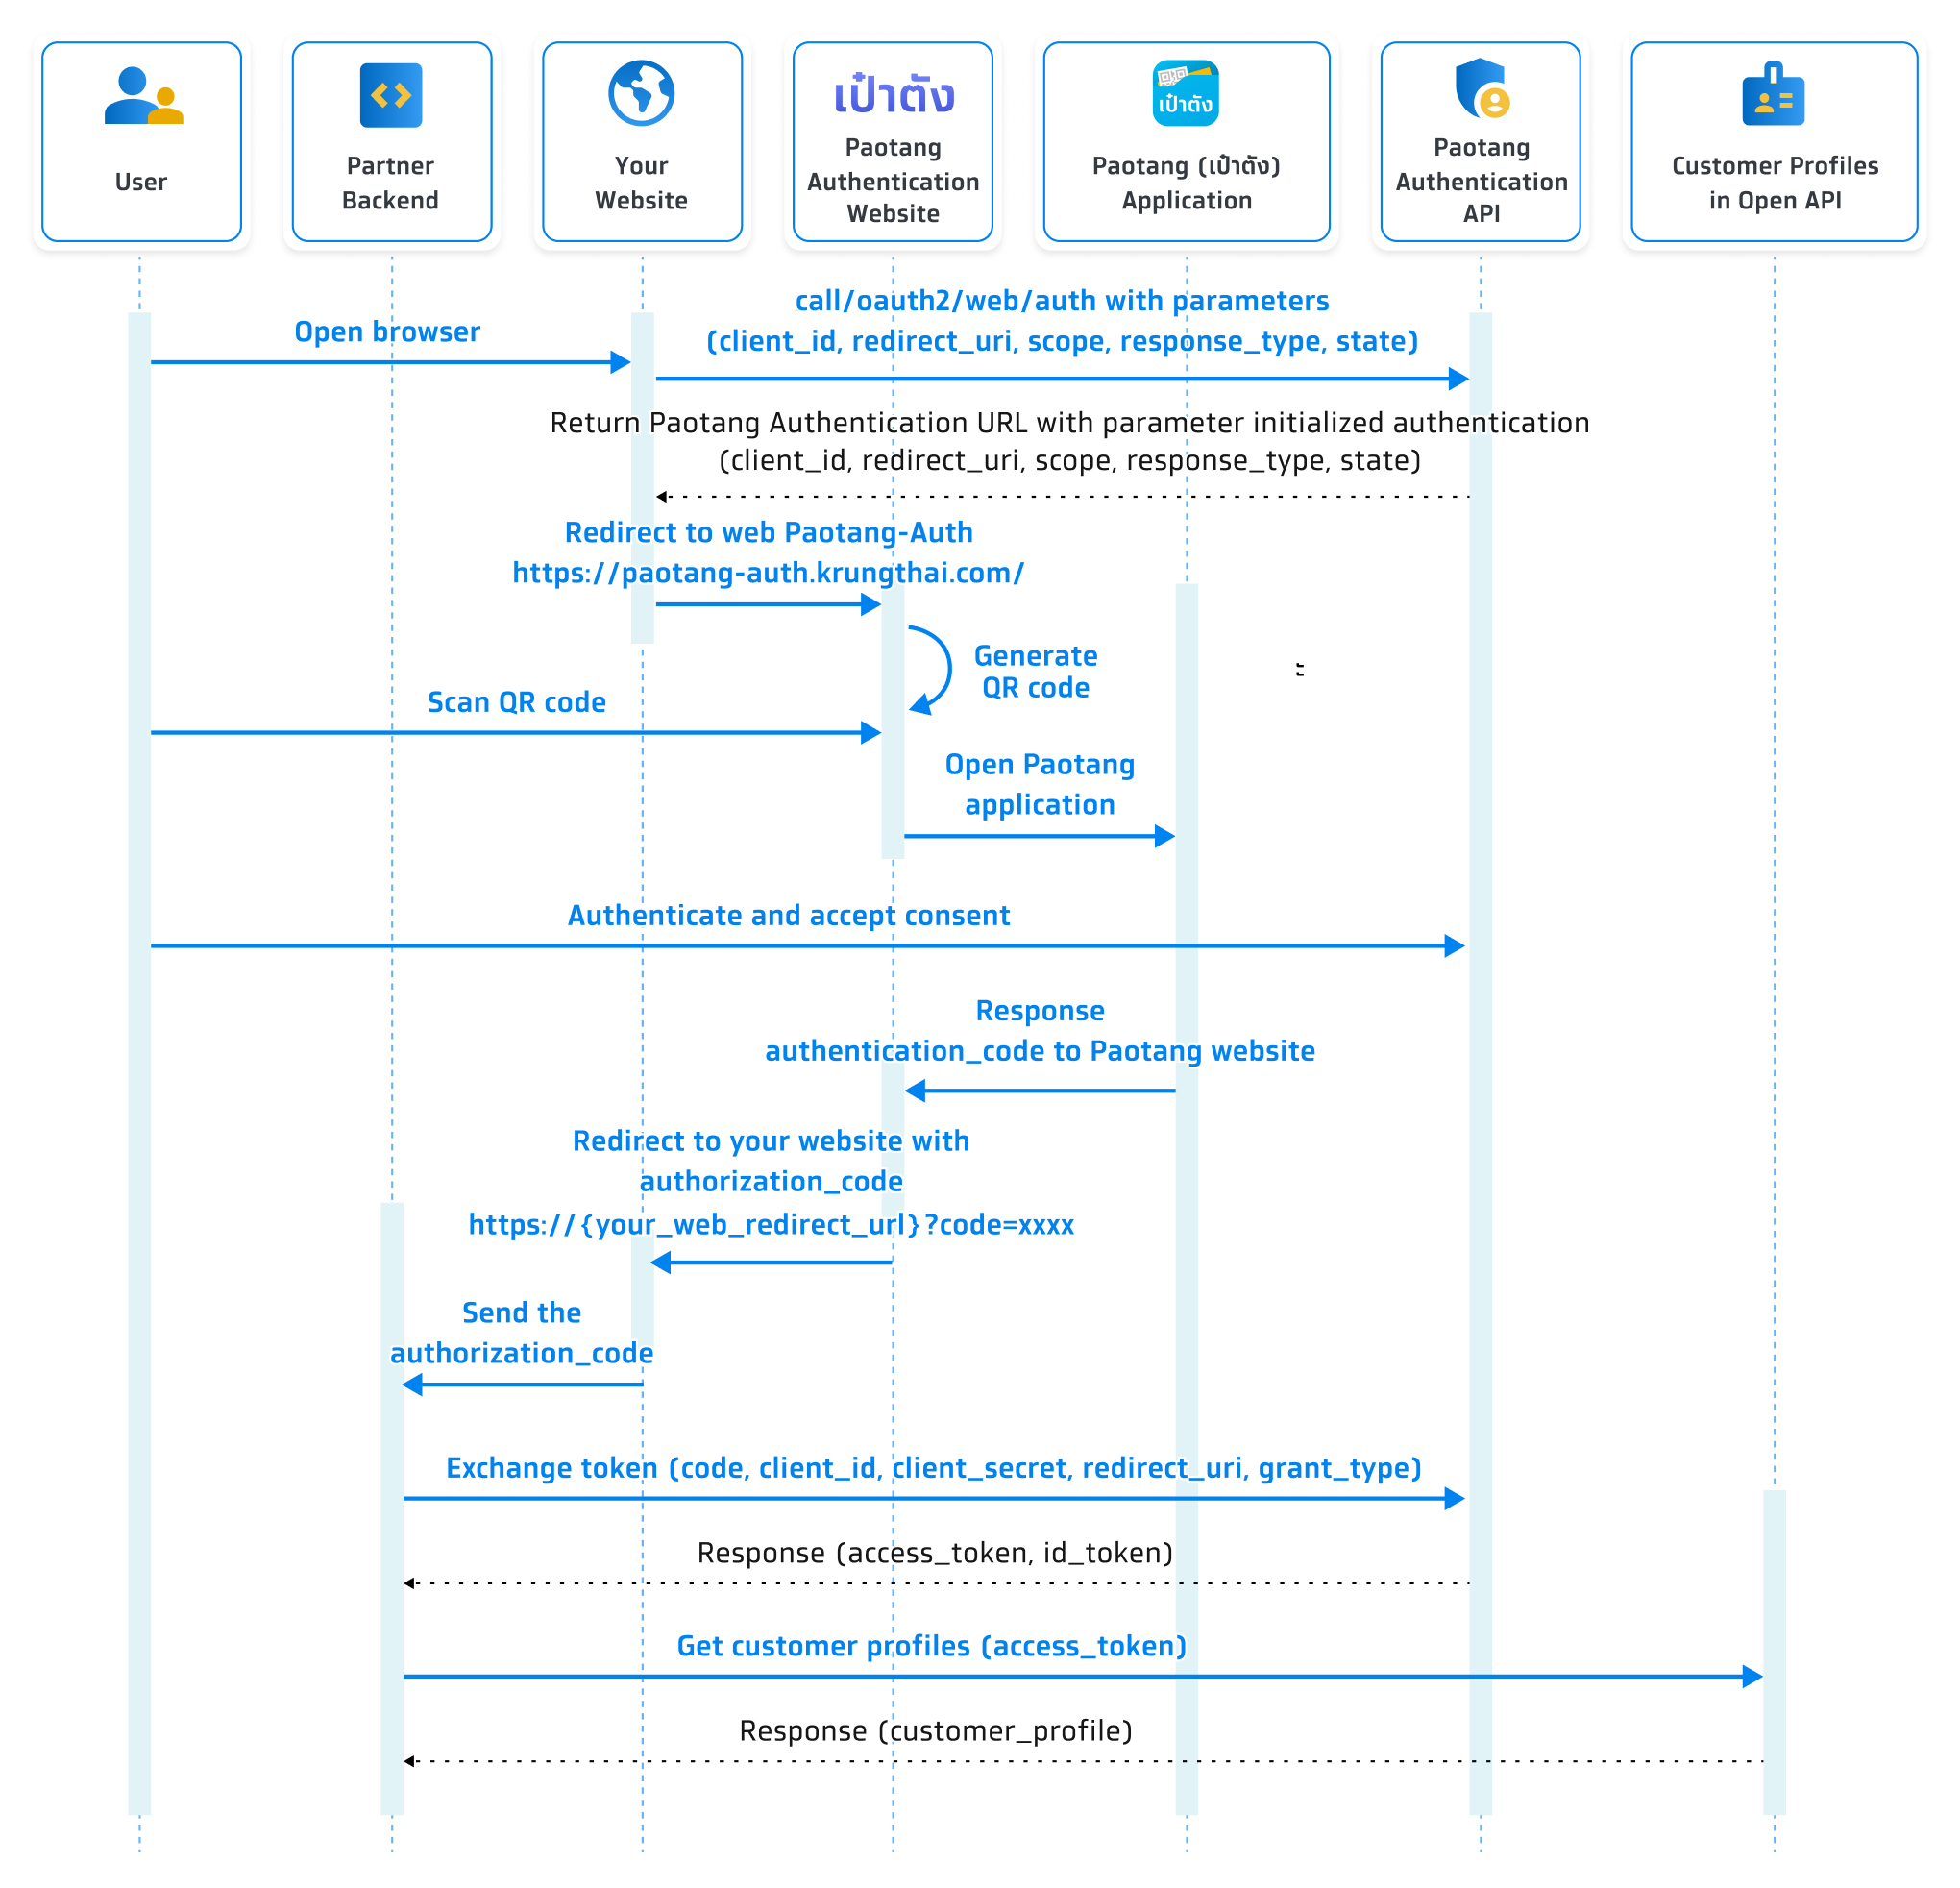
Sequence Diagram
Step 1 Create an application to get client ID and client secret
You need to provide the following information on Krungthai Developer Console to receive the client ID and client secret.
- Provide an application name to display on the consent screen.
- Provide a logo to display on the consent screen.
Remarks:
- The image should be a circle shape. If not, it will be adjusted to a circle.- Resolution must be 192x192 px.- File size must NOT exceed 50 KB.- The file format must be PNG. - Choose an API product that is suitable for your application.
- Choose ‘Authentication (QR Scan)’ with your desired package of data scopes.
- Provide a redirect URL.
- Provide a service provider name to display on the consent screen.
- Choose required fields for each data scope.
- Choose an authentication method to apply to your application.
- Choose a minimum Identity Assurance Level (IAL) to apply to your application.
- Choose a revisit type and duration, if required. Please see authentication with personal data revisit.
Once registered, you will receive this following information for API integration.
- Client ID
- Client secret
About data scope
| Scope (For initAuth) | Open API Scope Name | Title (Display on Consent Screen) | Get Customer Profile Object Field | Get Customer Profile Subfield |
|---|---|---|---|---|
|
openid offline |
Anonymous ID | - | - | |
| paotangid.citizen | National ID | เลขบัตรประชาชน | cid | - |
| paotangid.title | Title (TH) | คำนำหน้าชื่อ | title | - |
| paotangid.fullname_th | Full name (TH) | ชื่อ-นามสกุล (ภาษาไทย) | fullNameTh |
- thaiFirstName - thaiMiddleName - thaiLastName |
| paotangid.fullname_en | Full name (EN) | ชื่อ-นามสกุล (ภาษาอังกฤษ) | fullNameEn |
- engFirstName - engMiddleName - engLastName |
| paotangid.gender | Gender | เพศ | gender | - |
| paotangid.birthdate | Date of birth | วัน เดือน ปีเกิด | birthDate | - |
| paotangid.legal_address | Registered address | ที่อยู่ตามบัตรประชาชน | legalAddress |
- address - subDistrict - subDistrictCode - district - districtCode - stateProv - stateProvCode - postalCode - country - phoneNo |
| paotangid.mailing_address | Mailing address | ที่อยู่ปัจจุบัน | mailingAddress |
- address - subDistrict - subDistrictCode - district - districtCode - stateProv - stateProvCode - postalCode - country - phoneNo |
| paotangid.office_address | Work address | ที่อยู่สถานที่ทำงาน | officeAddress |
- officeName - address - subDistrict - subDistrictCode - district - districtCode - stateProv - stateProvCode - postalCode - country - phoneNo - phoneExt |
| paotangid.work_profile | Work profile | ข้อมูลการทํางาน | workProfile |
- occupationCode - occupationValue - occupationGroup - occupationGroupValue - subOccupationGroup - subOccupationGroupDesc - salary - salaryValue |
| paotangid.mobile | Mobile phone number | เบอร์มือถือ | mobileNo | - |
| paotangid.email | Email address | อีเมล | - |
Step 2 Initiate authentication request with Paotang and authorize your website
When a user clicks ‘Log in with Paotang’ or any other business logic, your website will redirect to Paotang Authentication website. Now, the user is in the process of authorization, you can refer to the flow as shown in the example below.
Your website needs to initiate authentication to {baseUrl_paotangAuth}/oauth2/web/auth with parameter (client_id,redirect_uri,response_type,scope,state). After that, user will be redirect to Paotang’s website, which will display QR code for authenticate in Paotang.
Initialize authentication API
Query string parameters
| Parameter | Type | Required | Description |
|---|---|---|---|
| client_id | string | Required | The client ID is obtained once you have created your application in Krungthai Developer Console. |
| redirect_uri | string | Required | The redirect URI is the URI you register for your application. The value provided in this field must match the URI you specify in ‘redirect_uri’ field when creating your application in Krungthai Developer Console. |
| response_type | string | Required | The response type is used to specify the type of response that you desire to get from the Authorization Server during the authentication and authorization process. It indicates how your application expects to receive user identity and access information. You need to specify ‘code’ for using QR scan flow. |
| scope | string | Required | Permissions requested from the user. Each scope uses ‘+’ as a delimiter e.g., openid+offline. You can refer to the ‘About data scope’ table. |
| state | string | Required | A unique alphanumeric string (minimum 8 characters) or UUID is used to prevent cross-site request forgery. When the response is successful, this value will return to your redirect URL. Your application should generate a unique random value for each login session. |
| prompt | string | Optional | The prompt value is used to specify whether the user is required to complete PIN authentication. If you require PIN authentication at all entry points, enter 'login'. If this field left empty, the user who 1. have already entered PIN to access Paotang application then 2. enters the flow by scanning QR will skip PIN authentication. |
| acr | string | Optional |
The acr value specifies the requested authentication method for this session.
If you require only PIN authentication, enter 'PIN'. If you require both PIN authentication and facial comparison, enter 'PIN_FACECMP'. Important: This request parameter is a preference only and must not be used as proof that the user authenticated with the requested method. The authoritative authentication method actually performed by the user is returned in the acr claim of the signed id_token (see Step 4). Your application must validate that claim before granting access to any resource that depends on a specific authentication method. |
Do not rely on the requested acr to enforce authentication strength
The acr value sent in this request travels through the user's device and any intermediaries between your application and Paotang. It can be intercepted and modified before reaching Paotang, and it can also be modified in any client-side state your application keeps for the session.For any business logic that requires a specific authentication method (e.g. a transaction that must be confirmed with face comparison), enforce it by validating the acr claim in the id_token after token exchange. See Step 4 → Validate the authentication method (acr claim).
About user authorization
User authorization is handled directly by Paotang
Applications that support Paotang Authentication don’t have to implement the authorization process themselves.
Developers specify the information they would like to access in the scope parameters, and users are asked to authorize those requests.
When creating your application, you should consider the possibility that users may not be granted the permissions you specify in the initialized authorization.
The consent screen may not always be shown
If the user has already granted the permission, the consent screen will not be displayed.Step 3 Receive an authorization code or error response that will redirect user to your website
When Paotang received a redirect URL from service which means a user completed the authorization process on Paotang. Then, it will redirect to your website. Consequently, the user has completed the authentication and authorization process.
Prepare your redirect URL
A redirect URL is where the user will be redirected after completing authentication with Paotang Authentication Service. A redirect URL should be a publicly accessible endpoint in your application. It is required to be a HTTPS URL.
In your website, create an endpoint that corresponds to the redirect URL. This endpoint will handle the response from Paotang Authentication Service. You need to parse the parameters in the query string of the URL to extract any response data, such as the authorization code. You can refer to the field that contains the response in the ‘Receive an authorization code or error response that will redirect user to your website’ section.
Receive an authorization code
Once the user has completed the authorization steps, they will receive a redirect URL with these query parameters.
Query string parameters
| Parameter | Type | Description |
|---|---|---|
| code | string | An authorization code used to obtain an access token, remains valid for 10 minutes, and can only be used once. |
| state | string | A unique alphanumeric string used to prevent cross-site request forgery. You should verify that the state matches the value of the state parameter given to the authorization URL. |
| scope | array | Permissions requested by the user |
Example of redirect URL:
https://{your_web_redirect_url}?code=EWy-q97GwgLhcplF5IQy6e12QUgrgJiUAZx1KC6p-mk.Xi_kvm3iBp21F8fvdnBcWLaHiS0hurRHTaUC49NTHF8&scope=offline+openid&state=JFI6%2FB%2Fo14hKA1YWjl6jypqYdGE1g56U98%2FNU2Jy7%2Fk%3D
Receive an error response
The user will receive an error response, if they decline to grant the permissions requested by your application. Then, they are redirected to the redirect URL with these query parameters.
Query string parameters
| Parameter | Type | Required | Description |
|---|---|---|---|
| error | string | Required | An error code |
| error_description | string | Optional | A description of an error |
| state | string | Optional | A unique alphanumeric string used to prevent cross-site request forgery. You should verify that the state matches the value of the state parameter given to the authorization URL. |
Example error response:
https://{your_web_redirect_url}?error=access_denied&error_description=The+resource+owner+denied+the+request.&state=thisisstate
Errors
| Error | Description | Note |
|---|---|---|
| invalid_scope |
- The requested scope is invalid, unknown, or malformed. The OAuth 2.0 Client is not allowed to request scope. - The request is missing a required parameter, includes an invalid parameter value, consists of a parameter more than once, or is otherwise malformed. The requested audience ‘hello-world’ has not been whitelisted by the OAuth 2.0 Client. |
Occurs when a scope request is invalid. |
| request_forbidden | The request is not allowed. | Occurs when something about security goes wrong during the process. |
| invalid_client | Client authentication failed (e.g., unknown client, no client authentication included, or unsupported authentication method). The requested OAuth 2.0 Client does not exist. | Occurs when client ID on authentication request is invalid. |
| unsupported_response_type | The client is not allowed to request response type ‘code’ because the authorization server does not support obtaining a token using this method. | Occurs when response type on authentication request is invalid. |
| invalid_state | The state is missing or does not have enough characters, and is therefore considered to be too weak. Request a parameter ‘state’, consisting of more than 8 characters, to ensure sufficient entropy. | Occurs when state or something about security goes wrong during the process. |
| user_cancel | A user cancels the flow during the process. | Occurs when a user cancels flow by clicking some buttons (e.g., the close button) during the process. |
| unknown_error | An unknown error has occurred. | Occurs when the root cause cannot be specified. |
| invalid_grant | The provided authorization grant (e.g., authorization code, resource owner credentials) or refresh token is invalid, expired, revoked, issued to another client, or does not match the redirect URI used in the authorization request. | Occurs when the refresh token expires. |
| service_unavailable | The server cannot process the authentication at the moment. | Occurs when something goes wrong during the process. |
Step 4 Exchange the token to obtain an access token
- Verify the id_token signature against Paotang's published JWKS.
- Validate the standard claims (iss, aud, exp, iat).
- Compare the acr claim against the authentication method required by the action the user is attempting. If it does not match, reject the request and re-initiate authentication with the correct acr.
- Optionally, check auth_time against your freshness policy if the action requires recent authentication (step-up).
To obtain an access token, ensure that the state parameters received alongside the authorization code from Paotang matches the one you specify during user authentication and the authorization request.
Request
| Parameter | Type | Required | Description |
|---|---|---|---|
| code | string | Required | A code obtained from redirect URL |
| grant_type | string | Required | The way an application obtains an access token. You need to specify ‘authorization_code’ for using QR scan flow. |
| redirect_uri | string | Required | The redirect URI used during initiate authentication request |
| client_id | string | Required | The client ID obtained from creating an application |
| client_secret | string | Required | The client secret obtained from creating an application |
| state | string | Required | The state used during initiate authentication request |
| scope | string | Required | The scopes requested from the user |
Example request:
curl --location --request POST '{{baseUrl_paotangAuth}}/oauth2/token' \
--header 'Content-Type: application/x-www-form-urlencoded' \
--data-urlencode 'code={your authorization code that obtains an access token}' \
--data-urlencode 'grant_type=authorization_code' \
--data-urlencode 'redirect_uri={your redirect url}' \
--data-urlencode 'client_id={your client id}' \
--data-urlencode 'client_secret={your client secret}' \
--data-urlencode 'state={your unique alphanumeric string}'
Response
| Property | Type | Description |
|---|---|---|
| access_token | string | Access token, which remains valid for 1 hour. |
| expires_in | number | The amount of time in seconds until the access token expires. |
| id_token | string | JSON Web Token (JWT) that includes information about the user. This field is returned only if OpenID is specified in the scope. |
| refresh_token | string | A token is used to obtain a new access token, which remains valid until 24 hours after the access token is issued. |
| scope | string | Permissions granted by the user |
| token_type | string | Bearer |
Example response:
{
  "access_token": "_-xO_oggXQwIThjjo8iPm5J2lf8Tsz33zdCGgd-bzBg.h31h1COKfEq4xdJbnuu9en_UQwXTJkV7Gf9aghuL9uY",
  "expires_in": 3599,
  "id_token": "eyJhbGciOiJSUzI1NiIsImtpZCI6InB1YmxpYzpj...",
  "refresh_token": "8EqQaJ3Xp8VX7tfG71m0L2SBEaXRwcXtFYwc34qB4qM.hnSvfnq0xypwIfXciAXgGHp7LcNOlbyddcs-cYVm2L4",
  "scope": "offline openid",
  "token_type": "Bearer"
}
About an ID token
An ID token is a JSON Web Token (JWT) that contains claims about the authentication of an end-user by an authorization server. It is designed to be consumed by the client application (also known as the relying party) and contains essential information about the user and the authentication event.
Structure of an ID Token
An ID token typically has 3 parts, separated by dots (.):
1. Header: This part contains metadata about the token, including the type of token (JWT) and the signing algorithm used.
Example:
{
  "alg": "RS256",
  "typ": "JWT"
}
2. Payload: This part contains the claims, which are statements about an entity. The payload includes standard claims like iss (issuer), sub (subject), aud (audience), exp (expiration time), and other optional claims.
Example:
{
  "at_hash": "6wMYdxWc64oZvXpn29UggQ",
  "aud": [
    "6c366ffe-eec5-4921-a71e-441d4d8444e4"
  ],
  "auth_time": 1682010030,
  "acr": "PIN_FACECMP",
  "exp": 1682013728,
  "iat": 1682010128,
  "iss": "https://paotang-id.devops.krungthai.com/",
  "jti": "69974269-621e-4f72-b00b-be8fa330794b",
  "rat": 1682010029,
  "sid": "e94530bb-211e-48f3-88a8-cd4566848dc2",
  "sub": "nvPDZgNvyK5xj61KIoctIqUTXfRzSAA27AKXD7rXGGBgYxEwCwXxI4M9eVcuiehMPUJH9KFJW5TKChP6F0DVpsMr"
}
3. Signature: This part verifies that the token was issued by a trusted source and that it has not been tampered with. It is created by signing the header and payload with the authorization server’s private key.
How an ID token is used
Upon receiving the ID token, the client application must validate it by following these steps:
1. Verifying the signature: Ensuring the token’s signature is valid and that it was issued by the trusted OP.
2. Checking the claims: Verifying that the token is not expired (exp claim) and that the token is intended for the client (aud claim).
3. Validating the authentication method: If your application requires a specific authentication method for the user's intended action, verify that the acr claim in the id_token matches your requirement. Reject the session and re-initiate authentication with the required acr if it does not match.
After verifying the token, the sub claim can serves as a unique key (anonymous ID) to identify the user across multiple sessions and interactions with the RP. It allows the RP to recognize the same user across different login sessions.
Validate the authentication method (acr claim)
When you specify the acr parameter during initialization (Step 2), Paotang will challenge the user with the corresponding authentication method. However, the acr request parameter is sent from your client and is not, on its own, proof of the method the user performed. The signed id_token returned in this step contains an acr claim that reflects the method Paotang actually used to authenticate the user. Because the id_token is signed by Paotang, this claim cannot be tampered with in transit and is the source of truth for authorization decisions in your backend.
For any flow that requires a specific authentication method (for example, a high-value transaction that must be confirmed with face comparison), your backend must:
acr claim values
| Value | Meaning |
|---|---|
| PIN | The user authenticated with PIN only. |
| PIN_FACECMP | The user authenticated with PIN and passed facial comparison. |
Example validation (pseudocode)
// After exchanging the authorization code for tokens (Step 4)
const claims = verifyJwt(idToken, paotangJwks); // signature + iss/aud/exp/iat

const requiredAcr = "PIN_FACECMP"; // determined by the action the user is attempting

if (claims.acr !== requiredAcr) {
  // Do NOT proceed. Re-initiate authentication with acr=PIN_FACECMP.
  return rejectAndReauthenticate(requiredAcr);
}

// Safe to proceed with the protected action
Common pitfall
Do not store the acr value you sent in the Step 2 request and use it as the authentication method for downstream authorization checks. That value is what your application asked for, not what the user actually performed. Always read acr from the verified id_token claims.Step 5 Get customer profile information from access token
Once Paotang has issued access token, the partner is able to use token to obtain the customer profile.
Get Customer Profile API
Example request:
curl --location --request POST '{{baseUrl}}/v1/paotangpass/get-customer-profile' \
--header 'Authorization: Bearer {your access token}'
Response
After a successful request to this service, the response should follow the user’s granted scope for this session.
| Property | Type | Description |
|---|---|---|
| code | string | The response code 0000 means success; otherwise, it means some errors have occurred. |
| message | string | As well as the property 'code', the response code 0000 means success; otherwise, it means some errors have occurred. |
| data | object | The JSON object of a customer profile |
Example response:
{
  "code": "0000",
  "message": "",
  "data": {
    "cid": "1234567890123",
    "title": "นาย",
    "fullNameTh": {
      "thaiFirstName": "วายุ",
      "thaiMiddleName": "ชื่อกลางถ้ามี",
      "thaiLastName": "มีตัง"
    },
    "fullNameEn": {
      "engFirstName": "Vayu",
      "engMiddleName": "Optional",
      "engLastName": "Meetang"
    },
    "gender": "M",
    "birthDate": "25400122",
    "mobileNo": "0123456789",
    "email": "test@example.com",
    "workProfile": {
      "occupationCode": "1257",
      "occupationValue": "กลุ่มเทคโนโลยี",
      "occupationGroup": "07",
      "occupationGroupValue": "พนักงานบริษัท/ลูกจ้างเอกชน",
      "subOccupationGroup": "99",
      "subOccupationGroupValue": "อื่นๆ",
      "salary": "6",
      "salaryValue": "40,001-60,000 บาท"
    },
    "legalAddress": {
      "address": "123",
      "subDistrict": "แขวงจอมพล",
      "subDistrictCode": "0400",
      "district": "เขตจตุจักร",
      "districtCode": "1030",
      "stateProv": "กรุงเทพมหานคร",
      "stateProvCode": "10",
      "postalCode": "10900",
      "country": "TH",
      "phoneNo": "012345678"
    },
    "mailingAddress": {
      "address": "123",
      "subDistrict": "แขวงจอมพล",
      "subDistrictCode": "0400",
      "district": "เขตจตุจักร",
      "districtCode": "1030",
      "stateProv": "กรุงเทพมหานคร",
      "stateProvCode": "10",
      "postalCode": "10900",
      "country": "TH",
      "phoneNo": "012345678"
    },
    "officeAddress": {
      "officeName": "ABC",
      "address": "123",
      "subDistrict": "แขวงจอมพล",
      "subDistrictCode": "0400",
      "district": "เขตจตุจักร",
      "districtCode": "1030",
      "stateProv": "กรุงเทพมหานคร",
      "stateProvCode": "10",
      "postalCode": "10900",
      "country": "TH",
      "phoneNo": "012345678",
      "phoneExt": "01"
    }
  }
}